Birka B22 Brocade
Birka B22 Brocade Trim for Garb
I have been tablet weaving for a few years, working through various Lozenge, Ram’s Horn, and Egyptian Diagonal patterns, all of which are standard fare for someone who is learning to tablet weave. While it is debatable whether these patterns show up in period, weaving them lays the groundwork for more complex techniques and patterns.
Recently in my Principality there has been an increase in people “improving their game”, and questing to be more correct in their personas. I believe it is partially due to more of us traveling the vast distances to Wars,to experience the magic of big events, and becoming inspired by what people elsewhere have been working on.
I started tablet weaving because of the beautiful patterns, and the portability of the craft. It is interesting to me how such a simple set of tools can be used to create so many complex patterns. The travel aspect is particularly important to me because a small loom can go with me to remote job sites, events, even coffee shops, whereas my floor loom for regular weaving is not even remotely portable. So what could I do in tablet weaving to reflect the trend to increase the pageantry of my Principality? In delving through the depths of my personal library and the internet, I came across the Birka finds, which date from the Eighth to Tenth Century in what is now Sweden, as well as some beautiful recreations which made me want to try the technique for myself. Only a couple other people in my Principality have done brocaded tablet weaving, and we are spread out over vast distances, but were all at about the same experience level at the start of this project. This was going to be a more individualized process to learn the initial skills than most A&S projects, because the lack of classes and get togethers.
Materials:
Excerpt from ‘Ecclesiastical Pomp & Aristocratic Circumstance’, pp13:
“The 1938 publication on the Viking age finds at Birka presented a large quantity of brocaded tabletwoven bands which were so well preserved that it was possible to analyze them closely. The majority of bands were warped with silk thread or silk and linen (or perhaps another plant fiber thread) with one example warped with silk and wool. Of the thirty-five separate fragments, twenty-three had brocade weft threads of silver wire only, eight had drawn gold wire only, one had both drawn silver wire and drawn gold wire, two had “spun-silver,” and one had “spun-gold.”’
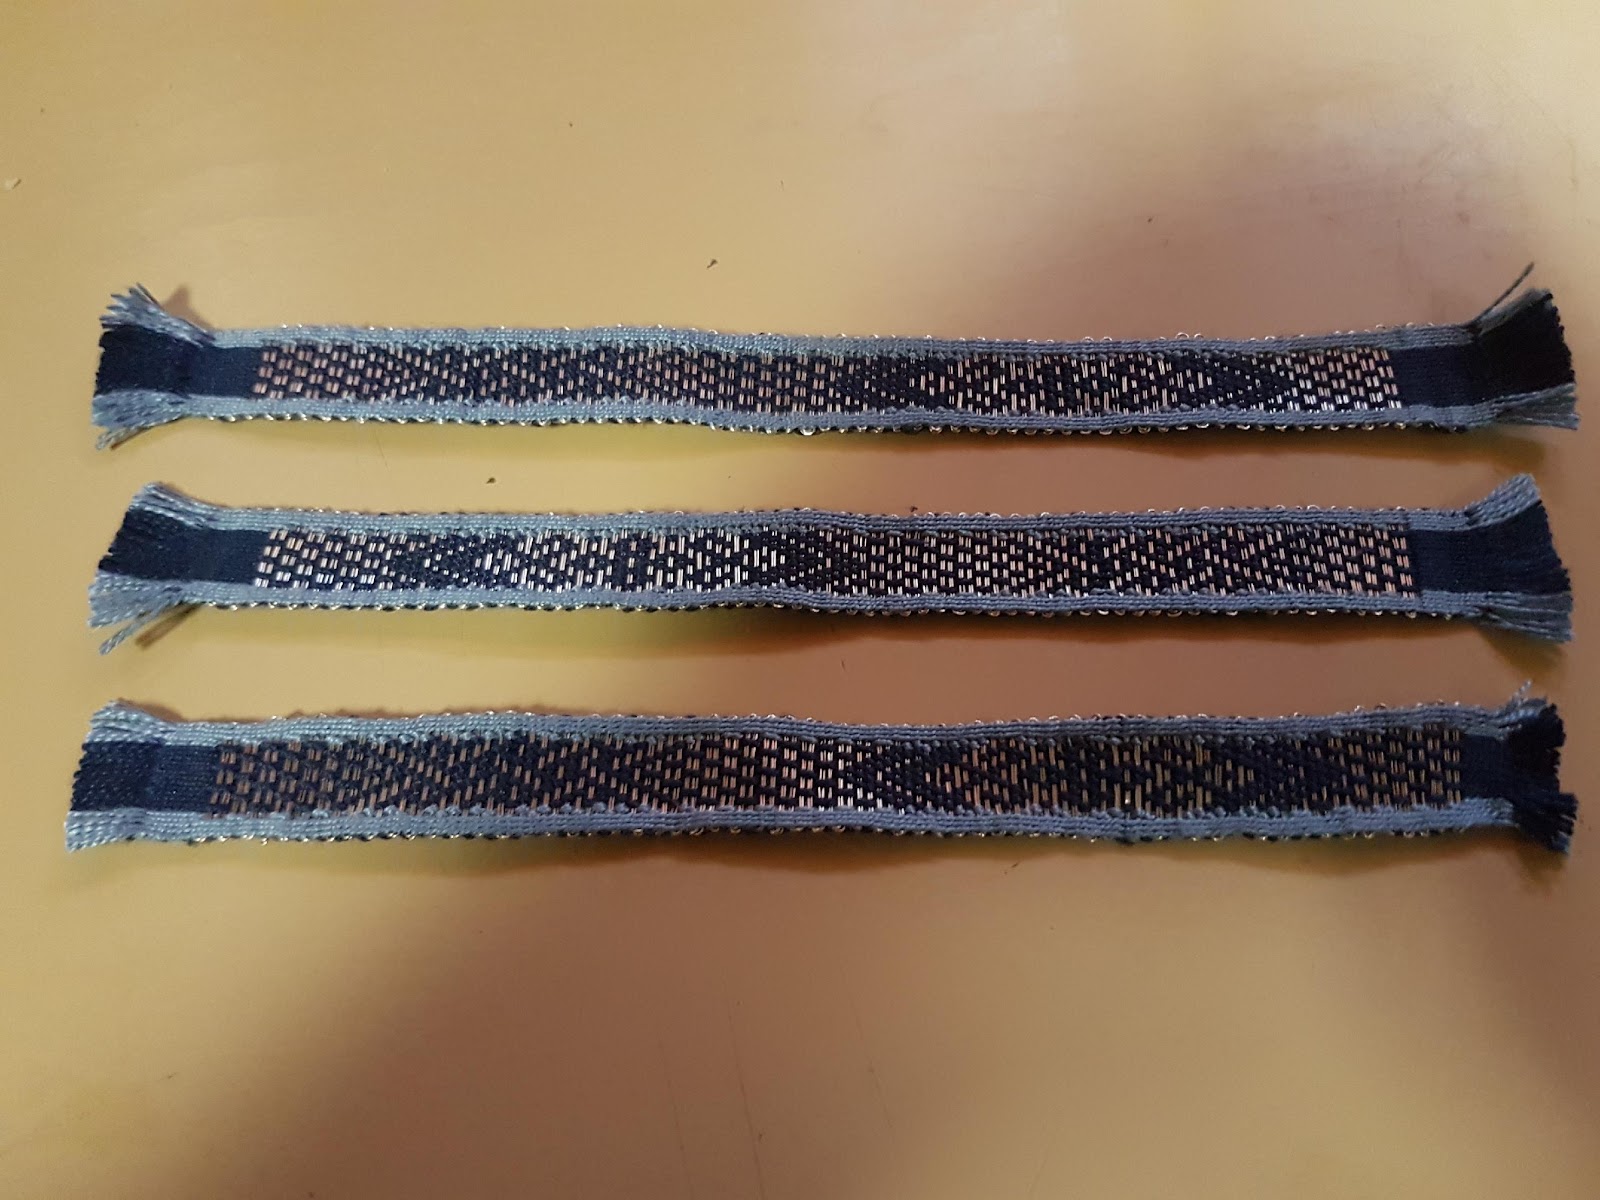
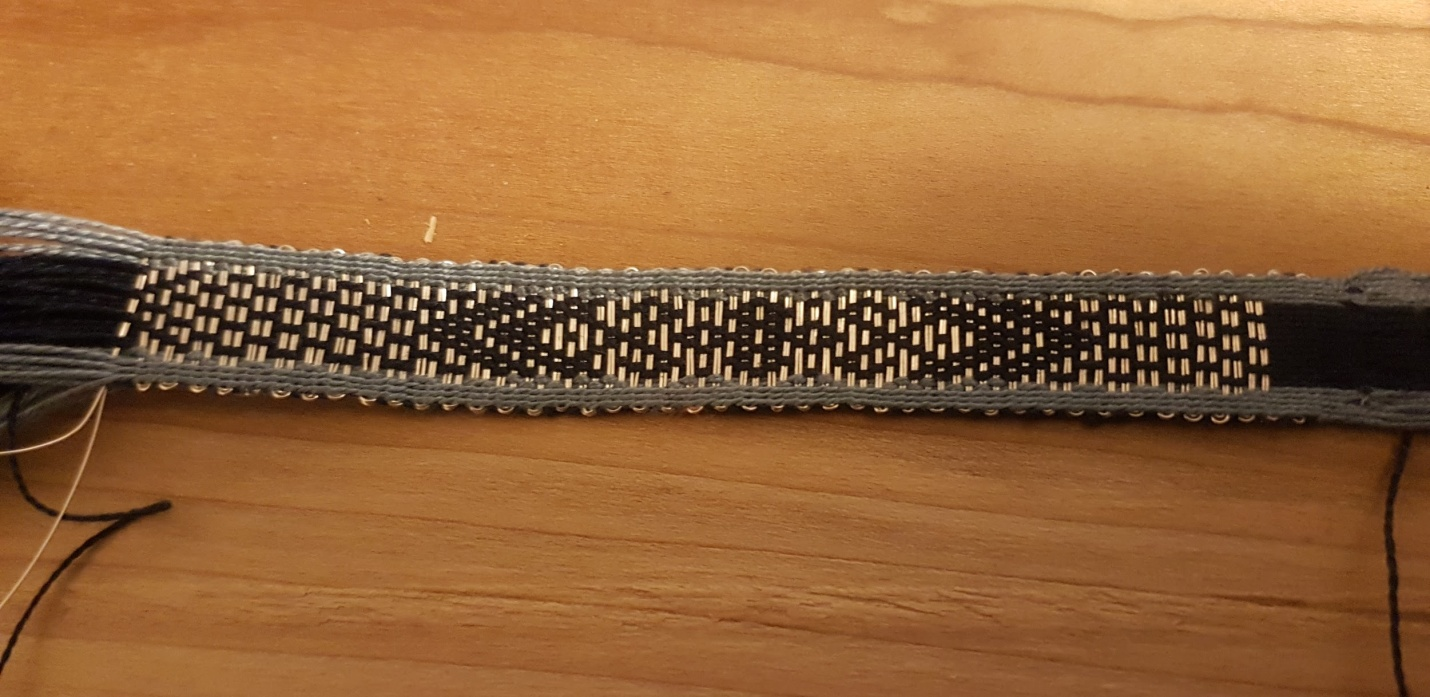
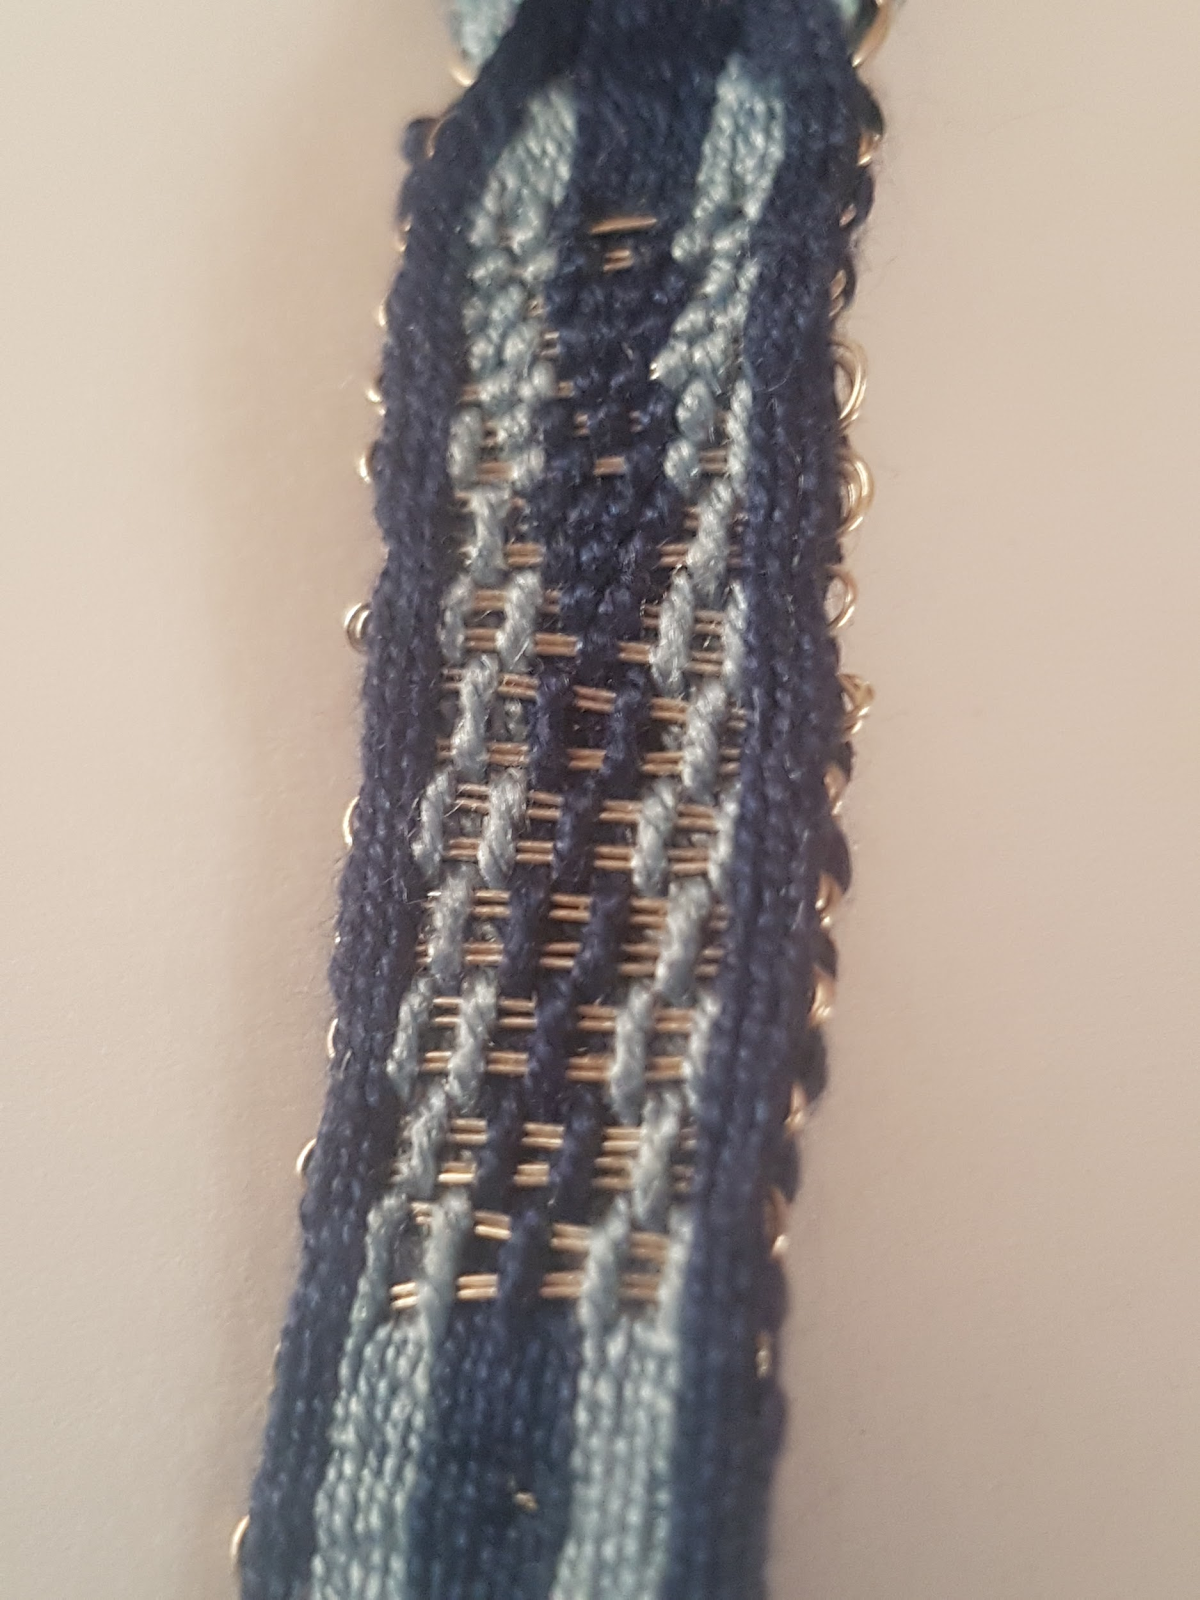
So the majority of the bands at Birka were silk, or a blend of silk and a less expensive fiber, and silver. Thus I chose to do my piece in silk, and sterling silver, with budget constraints and availability being the deciding factor for not using pure silver. Another factor was that finding thin silver wire was difficult, finding flattened wire to make spun-silver even more so. Spun-silver and spun-gold are thread wrapped with flat wire. My project uses 2/30 silk and 32 gauge, dead soft, round sterling silver wire. Blue was chosen because it was a popular color in Norse times, and because woad dyestuff was readily available, though I did not dye the silk myself. The extent finds of Birka 22 ranged from 8mm to 12mm. At 13-14mm my work is slightly bigger, but I also added borders that were not in the original because I liked the visual effect. Measuring just the pattern area, without including the borders, my weaving is 9mm wide--within the range of the extant brocades.
My end goal is to use these pieces as they would have been in period, as trim for clothing. I would like to weave the cloth for a coat, as it gets cold in my area of the Known World, and place the brocade as it would have been where multiple bands are sewn across the chest, based on what we can glean from the remains found in the Birka graves. While there are multiple patterns to choose from, I particularly enjoy Birka B22 as it has sections where the pattern looks interwoven.
Tools:
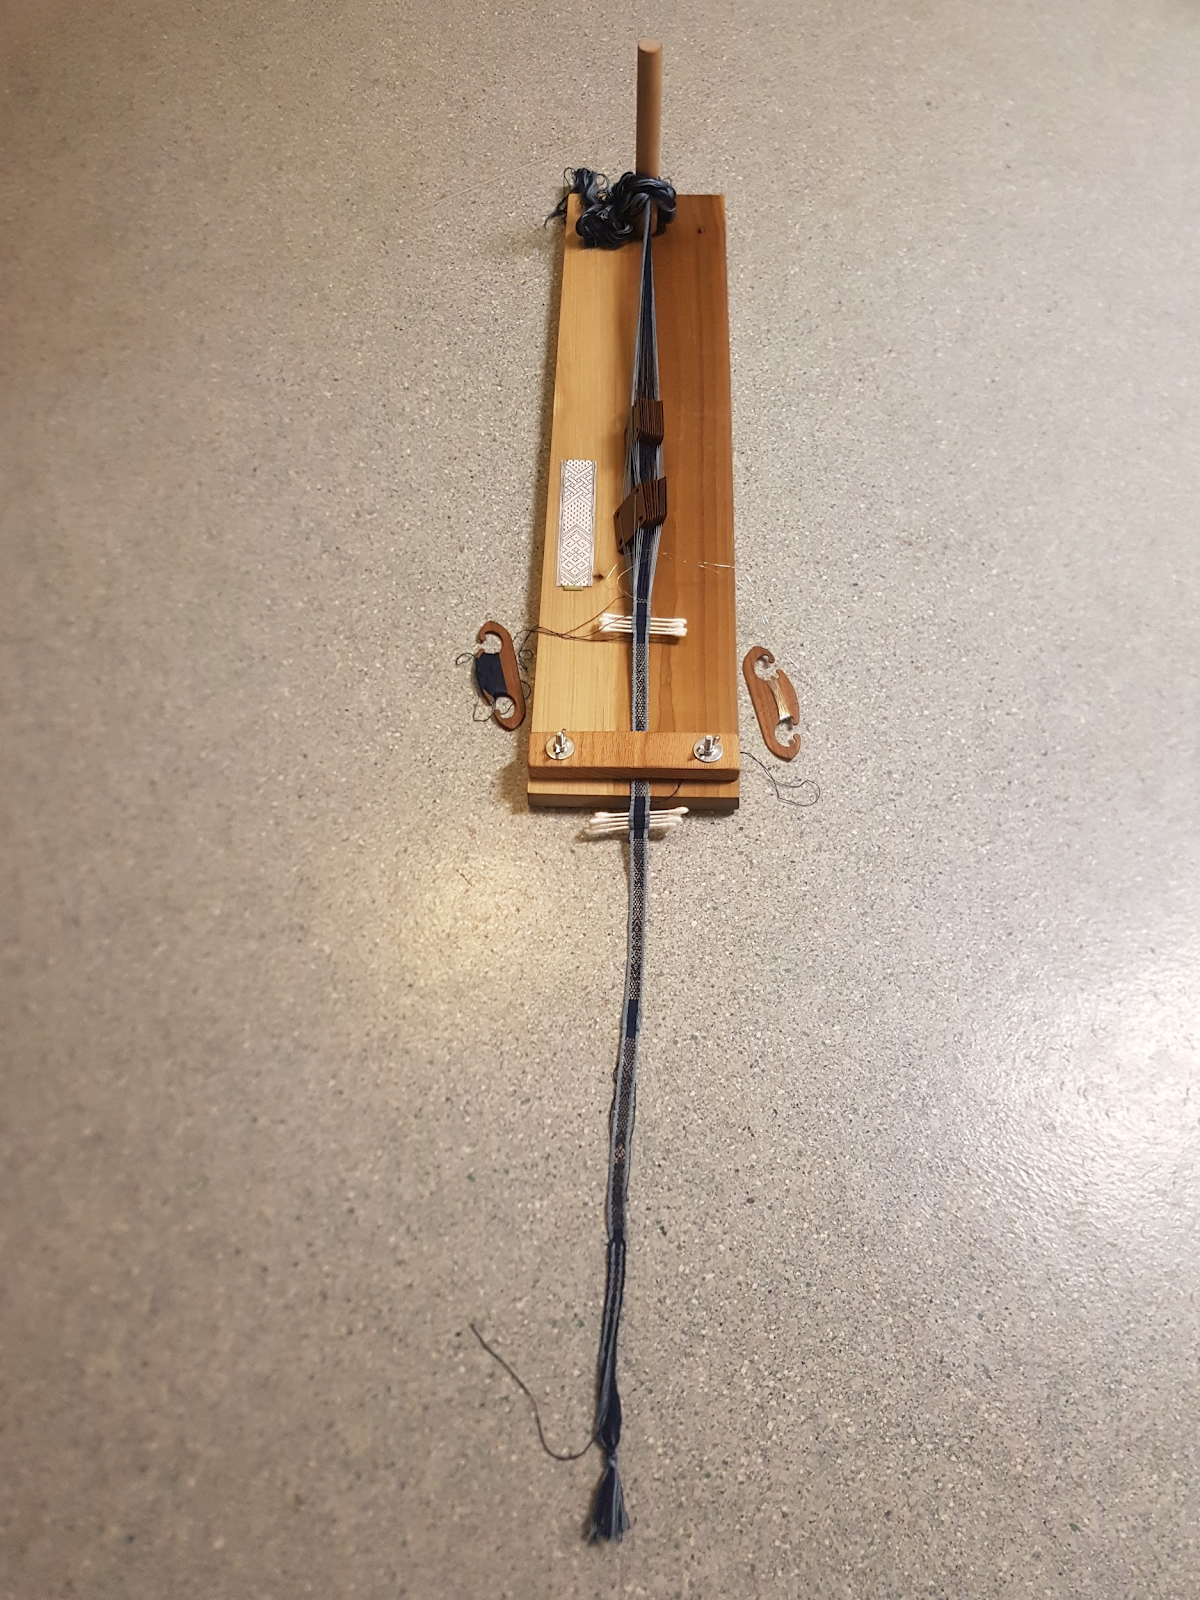
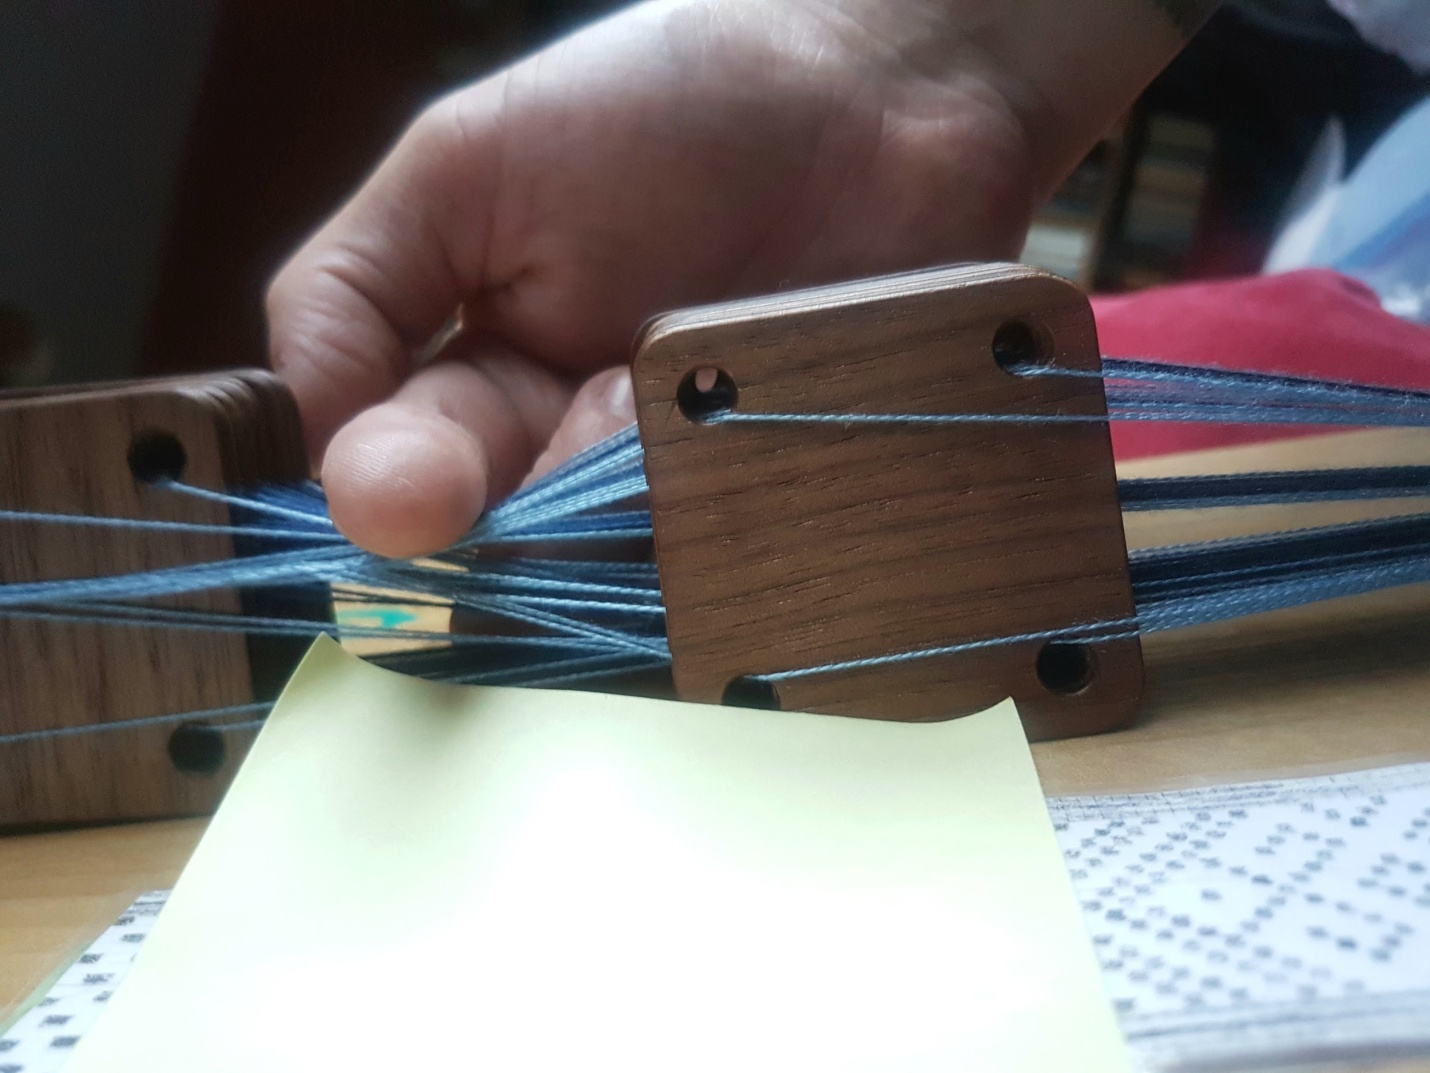
My loom was a gift from another member of my Principality. It uses the concept of a backstrap loom, in which the warp is tied to a fixed point, and the working end is clamped near to the weaver. It differs in that instead of being tied directly to the weaver himself/herself, it is run under a clamp attached to a board. This is far easier on my back, as I am not having to tension the warp with my body. Also as the cards are only turned one direction in the extant brocade, I can untie the warp at intervals and undo the twists that are created. The ability to undo the twists is important
because when each tablet is turned its group of four threads also twist. This twist builds up in the warp and eventually makes it impossible to continue weaving.
The tablets I used for this project are wooden, and were purchased from the same European craftsman who made my shuttles. I find that the wood is sturdier than the paper tablets that are on the market, and that the smaller dimensions are easier to get my hands around to turn them. There are no markings on my tablets, I feel that might be more authentic that way, plus it helps by forcing the weaver to learn to “read” their work.
While normally in brocading a pick up stick is used to literally pick up individual threads to create the pattern, I didn't use one. In using the “two pack” method, where pattern tablets were closest to me, and background were further, I stumbled upon a method that completely eliminated the need for a pickup stick. I have not found this technique in any of my research to date. There is no difference in the finished product. Two later pictures will explain how I was able to accomplish brocade without a pickup stick.
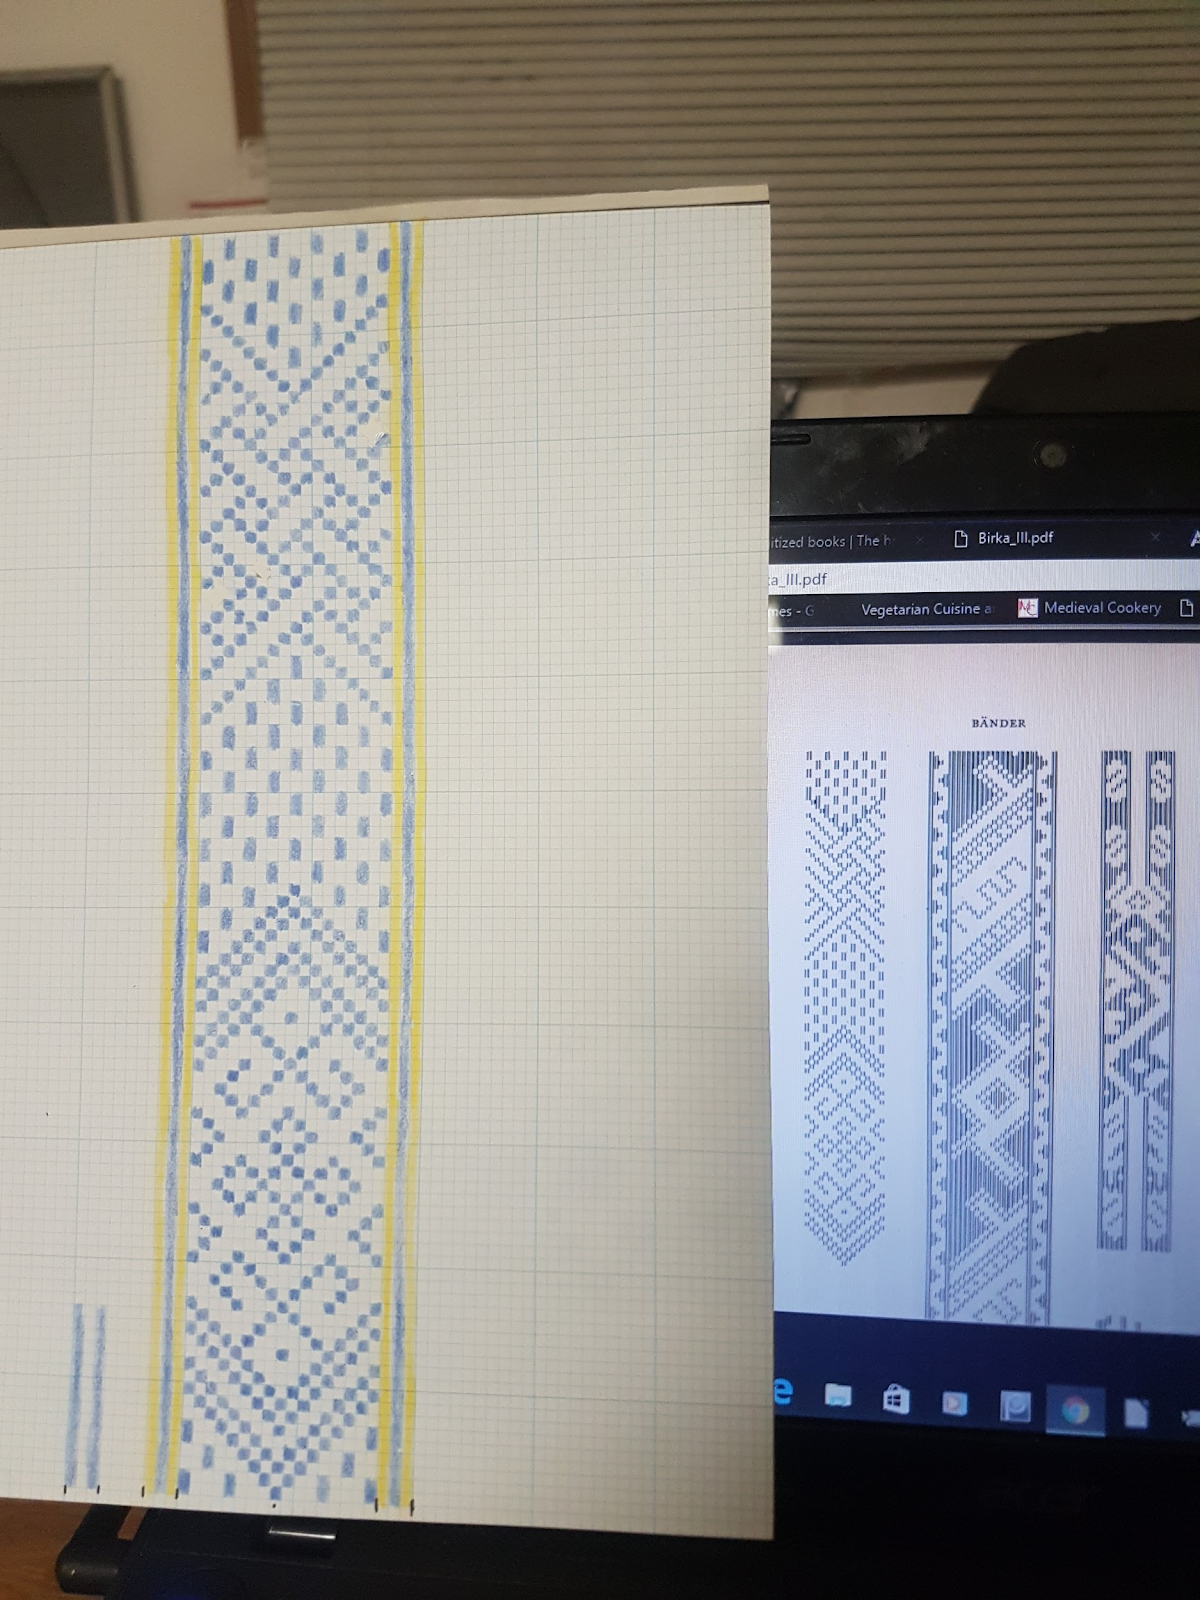
The original pattern of Birka 22 from “Birka III” by Agnes Geijer who was a Swedish archaeologist and textile historian, alongside my cleaned up version. The pattern was then photocopied, shrunk, and laminated for durability while traveling. Six tablets were added as a border, three per side because I liked the effect of having just a little plain weave on the edges. Thus far I have been unable to locate a translated copy of Ms. Geijer's book, and feel that it would be an important resource which should be in my library.

Measuring out the warp, which are the threads held under tension on the loom. Warping was done in the continuous method, between two fixed points, wherein the stack of tablets were all threaded at the same time from four cones of yarn. As each round was completed, another tablet was dropped off of the stack. Two C-clamps were used instead of a warping board as my mundane work requires me to travel to remote locations, so portability of tools is a key concern.
My first attempt was not very successful. Large loops in the wire at the turning points. This is because while very flexible, the silver is still hard enough to not want to make a sharper turn.
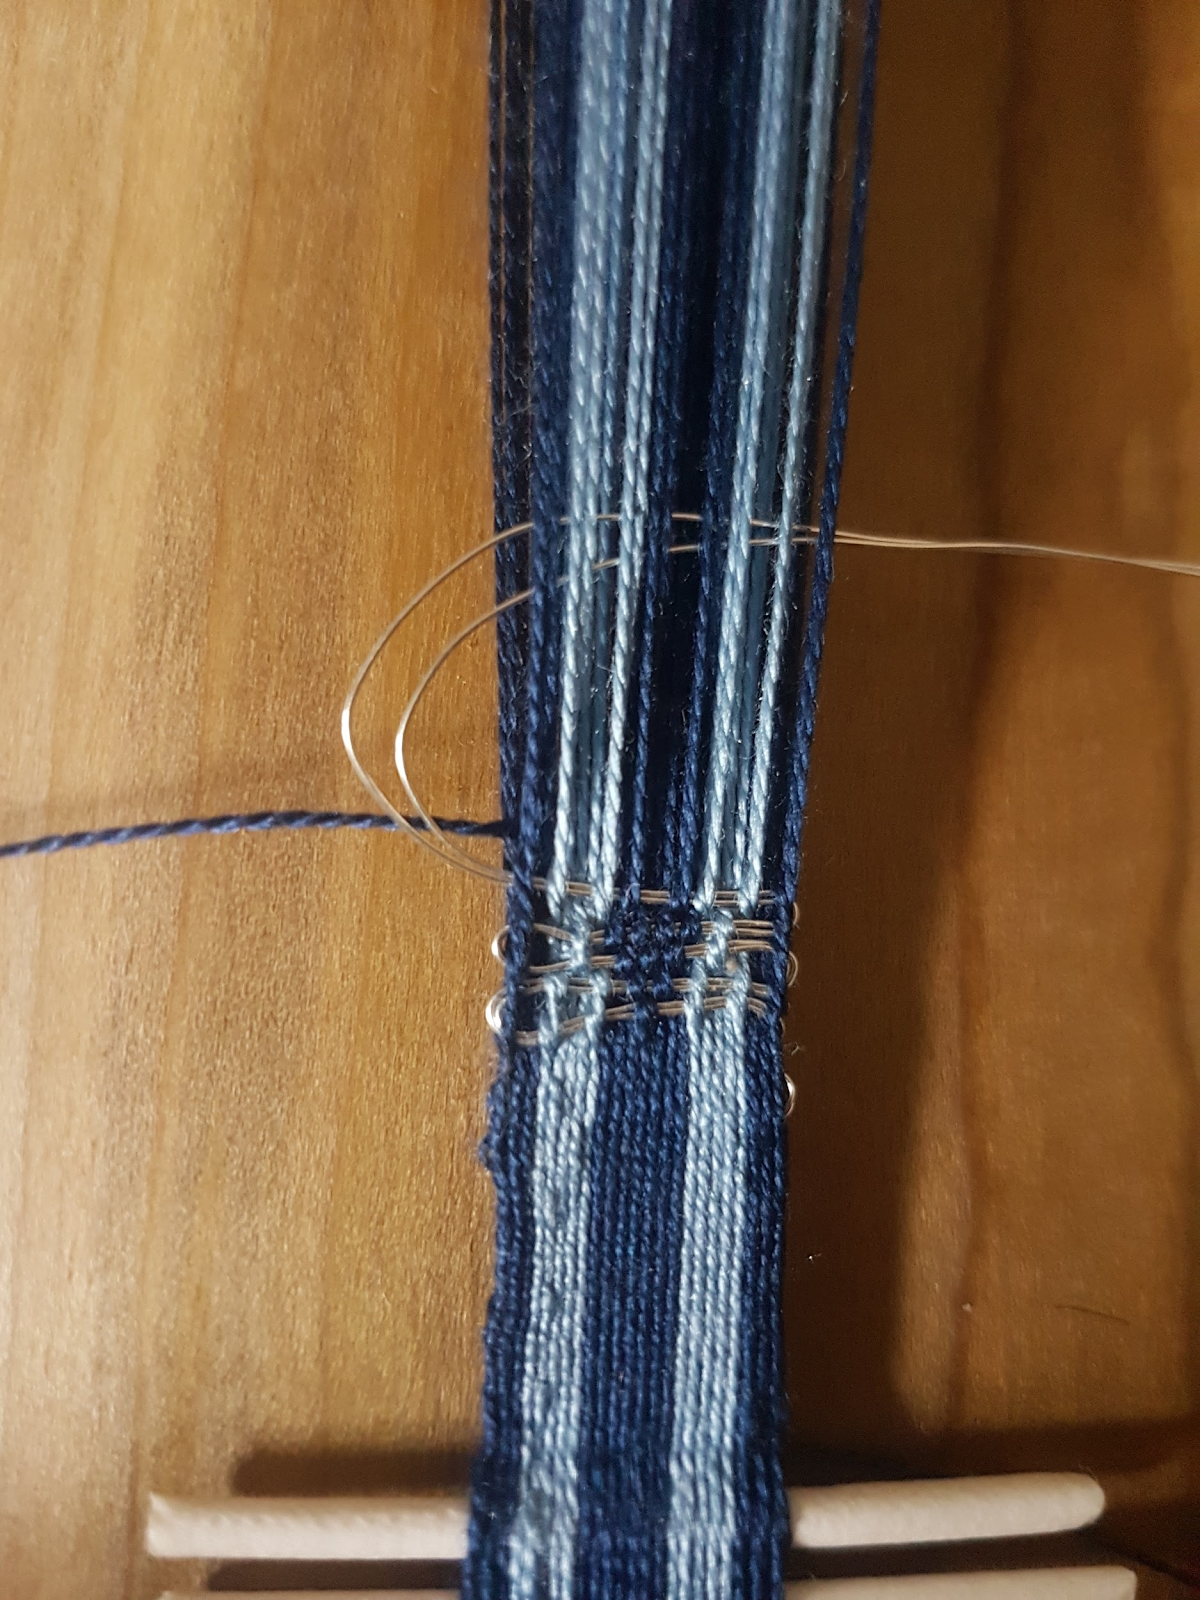
My second attempt was much better. With my secondary weft being smooth wire I found that if I left a couple inches of wire hanging to the side of the previous row, I could then hold down the main weft’s shuttle in the current shed, at which point I could tighten the previous row.

While this was successful, I was not happy with how the two different warp colors obscured the brocade. By reorganizing the tablets the pale blue was moved to the outside, where it makes a nice border with better contrast for the brocading. I still have the effect of having two warp colors, but it is a good example that “heraldry works”. By not having two colors together which are very similar the pattern is revealed.

To weave the ground layer with the primary shuttle. By lifting up in between the two packs of tablets the shed, the working space between two layers of warp is cleared (right) to make it easier to pass the shuttle between the correct threads. Since the warp coming from two packs ends up at variant layers because of the difference in distance to the work.
Here's the magic to weave the brocading with the secondary shuttle. The pack closest to me and the finished work is to the right of the image. These tablets correspond to the black dots on the pattern (tablets are rearranged at each row). By pushing down in between the packs, the background is lowered to the middle. The brocade shuttle (wire) is then passed under the topmost layer, on the right side of the photo. No pickup stick is required.
My tablets rest on the weaving board itself, it would be interesting to see if this same technique works when the warp is instead more suspended, such as on an inkle loom or period tablet looms..

Reverse side of a finished section with hem stitching to keep from unraveling.
Overall this has been a wonderful learning experience to create a version of Birka B22 brocaded trim. Between the research, hands on learning, and stumbling blocks, the project has enriched my skills considerably. Learning how to manage the brocade wire to get reasonably smooth edges, remembering to use high color contrasts for the clearest patterning, and finding a method to create the brocade pattern easily. For a reproduction piece it came out very well using the materials available to the modern weaver. I look forward to finishing out this warp with more trim sections, and to using them on a finished coat.
Supply sources:
Tablets and shuttles https://www.etsy.com/shop/Ampstrike
Silk weaving yarn
https://halcyonyarn.com/yarn/157/230-gemstone-silk-yarn
Sterling silver wire
https://www.firemountaingems.com/shop/sterling_silver-wire_wrapping_wire
Bibliography:
Adalheidisamj. Birka B20 band, blue. Https:/alicjajaczewska.com/2016/07/27/birka-band-2/, 2016
Collingwood, Peter. The Techniques of Tablet Weaving, 1982, 2002.
Geijer, Agnes. Die Textilfunde aus den Gräbern, Vol. III of Birka: Untersuchungen und Studien. Uppsala: Kungl. Vitterhets Historie och Antikvitets Akadamien, 1938, pp. 83.
Priest-Dorman, Carolyn. Metallic Trims for Some Early Period Personae. https://www.cs.vassar.edu/~capriest/metaltrims.html, 1994, 1996, 1997.
Spies, Nancy. Ecclesiastical Pomp & Aristocratic Circumstance, A Thousand Years of Brocaded Tabletwoven Bands, 2000.


