Showing posts with label painting. Show all posts

Monday, September 11, 2023

Garb challenge, horn, arm guard, general tinkering, more hats, and a musing.


Been up to several things since the last post. Made some new garb, took a cooking class, got an archery arm guard complete except for the ties, repainted a horn, made more hats, spun yarn, lucetted, worked on making coins, and of course went to events and had an excellent time hanging out with my chosen family.

Fighter demo back-to-back with a marathon water station was busy, but well worth it to spend time with excellent people. A few other events attended, as well as several A&S get togethers.


Figure 1: Nero helping with photography of the newest apron dress.


Garb Challenge:

There is a group on Facebook which is doing a garb challenge. The task is to create pride inspired items, which are then to be worn at your local Yule or 12th night, depending on your location. I finished this four panel, four gore, apron dress and separate front panel in enough time to wear it to some friends’ wedding. Surprisingly this was the most subtle rainbow outfit of all the ones in attendance. Next up is a new linen underdress with rainbow trim.


Figure 2: Was able to do pretty well with matching the panels. Gores didn't have that option.
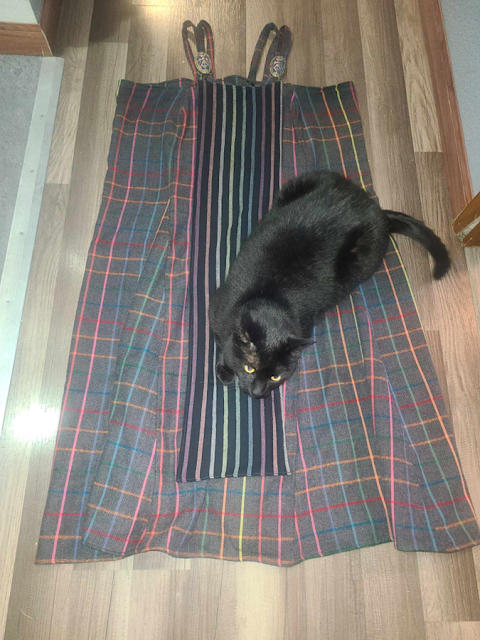
 

Figure 3: Photograph a dress, get a cat.


Figure 4: Friend wanted to make sure I had enough leather for the project, and Rajah decided to help with the photo.


Archery arm guard:

Decided that I was not finding the style of archery armguard that I was wanting, so decided to make my own. Leatherwork is new to me, so a good friend and I collaborated. He brought his tools and knowledge to a local craft and chat, while I brought leather and a willingness to learn. It did take two craft and chat sessions, one to carve and dye the leather, and a second to paint it.


Figure 5: Cut, carved, and punched arm guard.


Figure 6: Dye and grommets done.


Figure 7: Green was temperamental and required several coats.
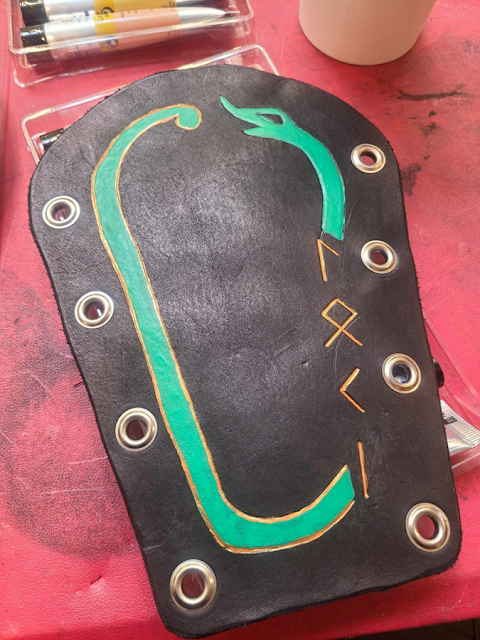
 

Figure 8: Gold paint in progress.


Figure 9: Paint finished, need to make cord.


Figure 10: Horn as received.


Purchased horn repaint:

Found an inexpensive musical horn at a major online retailer, but when it arrived it was not what I was expecting. I could get a really pretty note out of it. However, the advertisement had led me to believe I would be getting a natural-colored horn, with black paint details and carvings. What I received was a marble brown painted horn, with natural-colored carvings. The brown marble paint just wasn’t sitting well in my mind. Dry sanding with fine steel wool removed the paint, but then I had to think about the repaint for several months. When going to the craft and chat to paint my new archery arm guard, I grabbed the horn and brought it along. Since I already would have paints set up, why not? Maybe inspiration would strike. The same friend who was helping me with leatherwork suggested an aurora theme, and I ran with the idea. Really pleased with how it turned out.


Figure 11: Paint removal in progress.


Figure 12: Paint removal complete. Nice warm spring day, and a slight breeze for dust removal.


Figure 13: Gold paint done.


Figure 14: Starting the aurora. Blue done, with purple in progress.


Figure 15: Adding green.


Figure 16: Black for the rest of the carved lines.


Figure 17: Blue in the knotwork carvings.


Figure 18: Finished horn and arm guard.


Figure 19: Hot crucible and mold for ingots.


Coin making:

As part of the Oerthan Mint the group will periodically have working meetings. This time I manned the crucible, then poured hot pewter into forms. The resulting ingots later get rolled out into thin sheets, cut, and stamped into coins.


Figure 20: Cooking instructor gave us all brand-new spoons. I now know why this was a favorite kitchen tool.


Cooking class:

Attended a medieval cooking class where we cooked over charcoal. I made a kind of meatball, with currents and a semi sweet sauce. Everything that was prepared by all participants was amazing.


Figure 21: Learning to cook over charcoal, and use a ceramic pipkin.
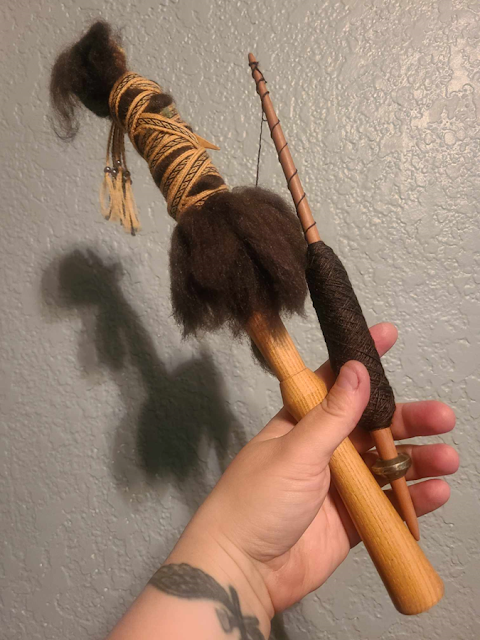
 

Figure 22: My favorite spindle and distaff, made by a wonderful craftsman in the UK. Currently spinning BFL and silk blended roving.


Spinning:

Currently working on a luscious Bluefaced Leicester and silk roving, which happened to be dyed by my Laurel. Can’t tell from this picture, but it also has silver and royal blue.


Figure 23: My favorite lucet, made by a local craftsman. For home use I have several plastic bobbins made by my best friend.


Lucet:

Picked up some large balls of crochet cotton. They are making really pretty lucet cord.


Figure 24: Hat specially made for an amazing friend.


Nalbound hats:

Made some more of my nalbound hats. Two had specific recipients, and a third went to Principality largess.


Figure 25: Mundane work trip had me waiting stopped for construction. At least I had good tunes and a project.


Figure 26: Special request for a friend.


Figure 27: Prize winning hat. Was donated to Principality largess.


Mundane life made it seem that I was not going to be able to attend the neighboring Shire’s event, but the day before plans changed, and I was able to be there for a half day. Actual conversation from this event.

"What are you working on?"

"Another hat, I make a bunch of these for largesse." *Hands over the red, black, and gold finished one*

"Are you going to enter this in the A&S contest?"

"I didn't know there was an A&S contest."

"You should enter it."

"You know your Highness, I do believe I will."

Long story short, I won the contest I didn’t know I was going to enter. As such I get to wear the Hrafnafjordr A&S Champion belt pouch for the coming year.


Figure 28: Hrafnafjordr A&S championship belt pouch.


Figure 29: New windows, and future home of my floor loom.


Windows and loom:

The new windows got installed. Now I can get my floor loom out of storage, and finally set it up! Super excited to have my four-harness counterbalance floor loom working again. Already have a few ideas for upcoming projects, mainly featuring my favorite weave structure, variations of 2/2 twill.


End note musings:

I had a couple conversations with friends at this Summer Coronet which have really stuck with me. Thinking about peerages in the Society.

I was talking with a newcomer about the meanings of different belts in the SCA, and a friend walked by wearing two belts, a white and a green. It was a perfectly timed example to show that you can be multiple things at once.

Later I went up to this same friend while we were watching the fighting and talked about conversing with this newcomer. My friend, the Knight and Apprentice, said of both his belts “I am but a student.”

Well, this rang a very familiar chord with me. In my mundane life in order to do our job, we have to take very rigorous tests in order to get a license from the Federal Government. It is a common saying in the industry that this is a “License to Learn”.  After almost ten years of having mine that rings more true now than I ever imagined when I earned the industry license.

I have heard several phrases over the years how a peerage is a steppingstone, the real learning now begins, etc. But somehow this friend’s simple statement “I am but a student” was the most powerful, and the most thought provoking.

Later that night another friend was sitting vigil for their very first peerage. As is custom she had lots of visitors over the course of the evening. When it came time for my visit, I brought up the conversation with the Knight/Apprentice, and how it had gotten me thinking. We had a good talk about the crossover of things we have learned in our mundane careers, and what we have learned in the SCA.

So, my personal crossover is that a peerage is a license to learn.

Sunday, March 19, 2023

The Little Tablet Loom That Snowballed


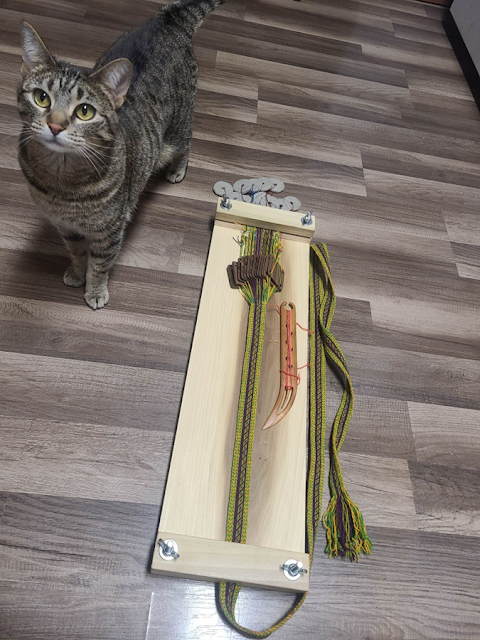
Figure 1 Finished loom with tablecloth.


If ever a project completely snowballed, this is that project. The original goal was to make a new tablet loom. One that could easily travel to demos, simple to use, and look pretty for the public. Well, it didn’t just grow legs, it grew wings. Besides making the new loom, I made loom weights and bone shuttles, did my first bone working, first scrimshaw, and first woodcarving, then painted the loom. Additionally I purchased bone tablets, and metal pins to secure the tablets when not in use. Also made a tablecloth for the travel demo table, with a runner because it was pretty.

If you are not familiar with tablet weaving, I highly recommend Tablet Weaving for the Absolute Beginner by Elewys of Finchingefeld. She does a very nice introduction video, and if you browse her channel there are several different how to videos for various patterns, complete with a historic description of each. As she mentions in the beginner video, there are many different subtle differences in technique. I liken it to knitting, no two knitters do everything exactly the same, and no two tablet weavers do things exactly the same, but we still make beautiful things with string.


Figure 2 Finished loom.


Loom- I have a few different looms for tablet weaving and I do love them. They are super simple, a board with a stick at one end and a clamp at the other. They have mostly fit my needs, being reasonably portable, the tablets rest on the board instead of being suspended in air, I can tie the warp to the stick and not have to rely on a pole or a tree, and by having a clamp at the end closest to me I am not aggravating my back with a backstrap style loom. But over the years I have found that getting even tension on the warp after advancing is problematic. Also, a lot of the patterns I do don’t have balanced turns, so the built-up warp twist from weaving continues to build in those tablets, but not in others, making some tight and some loose. I really wanted to try tablet weaving with warp weighting, and it would be a nice experiment in preparation for the eventual building of a full sized warp weighted loom. Warp weighted would also mean that I could get rid of built up twist quickly and easily.

The new loom was supposed to be a prototype. But it worked so well that I decided to decorate it, making it pretty for demos.


Figure 3 Ezabi helping to photograph the new loom with test project.


Based on the looms I have used for years. Instead of a stick and a clamp, this one has two clamps. The clamp closest to me snuggled down, except when advancing the warp. The clamp that is away from me has a little riser to lift the warp just a little bit and make the tablets sit better. The distant clamp also is only tightened for transport, to prevent tangling. Otherwise it is just a guide for the warp.

If you are interested Lady Elewys of Finchingefeld shares her own experiments with reenactment looms in the blog post “Thoughts on Period Looms” and has several lovely examples of archaeological finds, recreations, modified recreations, and also modern looms.

Weights- Now that I had a new loom, I needed the weights to go with it. Being that it is planned to go to demos, I wanted something that looked the part. After much pondering I finally decided on how this would be accomplished. I don't have access to a pottery studio. Rocks would require finding, and it was deep winter, as well as needing to figure out attachment to the warp. Availability and access made me go to the hardware store and the craft store. By stacking washers I could get reasonably consistent weight, while covering with polymer clay would give the look I wanted, simulating a rough clay weight.


Figure 4 Stacks of washers being wrapped in clay.


Figure 5 Stacks of washers wrapped in clay, colors show different weights.


Immediately went to making three sets of weights, instead of making one set and trying it out. Fortunately it worked out and I now have three sets of twenty, with two washers, four washers, and six washers. This also gives me flexibility for different thicknesses of yarn and the weight requirements they will need. The weights are color coded, and can be mixed and matched as needed. Originally purchased one box of washers, then played around with different stacks, testing the weight. After deciding the weights, had to purchase a lot more washers. From there stacks were built, with a couple dots of super glue to hold the washers together. After that the washers were sandwiched in two thin layers of polymer clay, color coded by weight, in the colors of natural clay and stone. Then baked to cure the clay. The final step was to add a string to each weight. Purposely left them a little rough, as they are made to imitate historic production tools.

Test run- I found some of my purchased wool yarn and chose a simple pattern. Wanting to do a full test a pattern that was only turning the tablets forward would build up the most amount of twist. Each tablet got its own weight, secured with a slip knot, then excess warp was chained to keep it organized and out of the way. Removing excess twist was super easy, and advancing the warp was almost a dream. Slightly fiddly and repetitious for each individual tablet, but incredibly easy and even tensioned. There was genuinely an epiphany moment, as I legitimately should have made a warp weighted tablet loom years ago.


Figure 6 Advancing the warp by moving the weights and resecuring bundles.


Tablets- I did not make these. Purchased bone tablets. I did have to file down some sharp edges, including the holes, but otherwise these came ready to go. They kicked off the whole decoration movement in this project. As I mentioned, the majority of this loom project is to make a pretty tool setup for demos. The tablets were shipped in and ended up being about the same size as my favorite wooden tablets. I had wanted to purchase a matching shuttle or two, but the merchant did not have anything available for the foreseeable future.


Figure 7 Purchased bone tablet with cleaned beef bone.


Shuttles- Originally was going to purchase a bone shuttle or two to go with the new bone tablets. But was unable to find anything for sale at the time. This prompted watching several videos. Determined that the easiest source for beef bone would be the local pet store. Though I was holding onto the idea of visiting a butcher, if the pet store idea didn't work out. It turned out that the pet store had some fairly nice pieces of bone, all cleaned and ready for me to start working on. As I am still working on setting up my own workshop, a good friend offered to let me come over and use his saws and sanders. Made sure to bring my respirator, as I was warned bone dust is not something that you want to breathe. After much conversation, and some tool usage, blanks had been made for two shuttles. Next was filing, hand sanding, and polishing. The transformation was fun to watch, as it is with projects,  this one going from a rough cutout, to smooth shiny bone. As per a how two video, covered the area to be decorated with India ink. Scratched the design with a sail needle, then covered the scratches with more India ink. After that, the finest grade of steel wool available at the local hardware store was used to rub off the excess ink. At this point I learned my original sanding wasn't quite as smooth as I had thought, as the ink picked up the remaining scratches. Actually liked the effect, so put ink on the rest of the shuttles' surface in order to pick up those scratches too. The finished look for the shuttles is a bit rustic, but overall really pretty. Final step was to take some plain beeswax, rub it over the surface, then polish with a cotton cloth.


Figure 8 Safety first, don't want to breath in the dust. Safety glasses are in use too, though they don’t show up in the photograph well.


Figure 9 Blanks ready for sanding.


Figure 10 Scrimshaw being revealed.


Tablecloth- Found a great little table that would travel well for demos, and tested out to be perfect for the loom, but it is glaringly modern. So, I made camouflage. Retail tablecloths were all too small to go all the way to the floor. But my local fabric merchant had some yardage of black cotton which fit the bill. Cut to fit, hemmed, added ties to secure to the tabletop, and topped off with a pretty table runner I found. The design on the table runner is from Scandinavian petroglyphs from the Nordic Bronze Age (c. 1500-500 BC), which is very much Pre-Viking. These designs are found prevalently in southern Scandinavia, and use some of the same elements as rune stones.


Figure 11 Nero (center) and Ezabi (left) helping to photograph the finished loom and tablecloth.


Carving- This was my first wood carving. Used a V liner, and it seemed to work rather well. The design is based upon U991 in Broby, Sweden, just East of Uppsala, a runestone dating between 725–1100. The original stone had runes engraved "Þegn and Gunnarr raised the stones in memory of Veðr, their brother." into the Midgard serpent, and they are very beautiful. However it was decided for this project that a simple line down the middle would be a good choice. The upper animal was replaced with my own heraldic black ram. Finding the simpler top combined with the busier sides to be very pleasing. As rune stones were painted as well as carved, this little loom also got painted. Acrylic was chosen for availability, and colors based on historical examples. May be repainting after this weaving project is done due to issues with the finish.


Figure 12 Drawing out the design.


Figure 13 Carving in progress. Knob and V-liner used for hammer and chisel.


Figure 14 Painting in progress.


Figure 15 All the little pieces and parts getting their turn.


Finishing- Used a satin spray varnish. Something was off with the varnish this time. Used this many times before, on wood with this brand of acrylic paint, however this time three of the paint colors became discolored. Wondering if it was because the can was almost empty, or it might be a bit old. Going to think about repainting the acrylic after this particular weaving project is complete, this will give some time to decide to repaint or not to repaint. The current thought is repainting, after purchasing a new can of varnish.

Figure 16 Pins in place for advancing the warp. First weaving project since finishing the loom is in progress.


Conclusion- Overall I am extremely happy with this little loom. Its basic design and small size make it easy to transport. Warp tension is very consistent. Warp advancement is easy to accomplish. Warp twist buildup is simple to relieve. While I should have made a similar loom years ago, I have a full appreciation now for the ease and simplicity. Though the basic design is not period, it does an excellent job with the reenactors dilemma of functionality within our modern constraints.


Figure 17 View from my side.


Sources-


How to Scrimshaw a Whale (Your First Scrimshaw Project) by Stockman Original

https://www.youtube.com/watch?v=9ZJqQmFfdYQ


Tablet Weaving for the Absolute Beginner by Elewys of Finchingefeld https://www.youtube.com/watch?v=ooNOYUtc2ek&list=PLd0nXFWcaeavM2zPkY0tDPUmd5hnEDZEA&index=4


Thoughts on Period Looms by Lady Elewys of Finchingefeld http://ladyelewys.carpevinumpdx.com/tag/oseberg/


Simple Carving With Basic Tools by Wood By Wright How 2

https://www.youtube.com/watch?v=oSxxv4YwGZw


U 991 by The Digital Search Tool Runor

https://app.raa.se/open/runor/inscription?id=3bf11f57-dbea-41b5-8f84-bda3532dd6ef