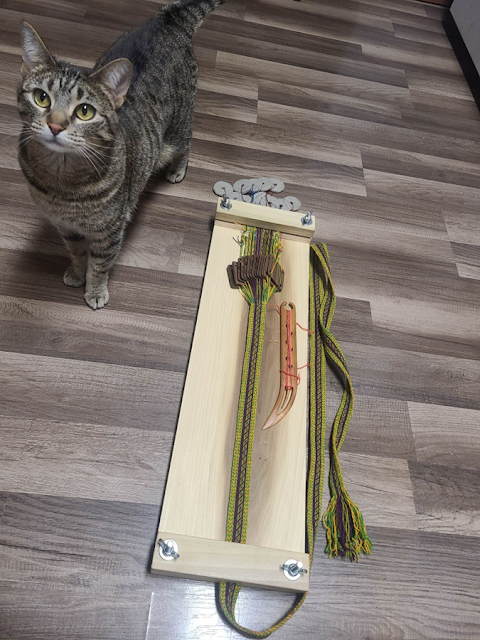
Figure 1: Ezabi has taken over my office chair.
Been participating in the 100 Days of A&S Challenge. It
is based on a similar challenge that our fighters do. In this we do 100
consecutive days of Arts & Sciences, at least 10 minuets a day. As per the
group rules, research counts, and so do Mundane (modern day, non-reenactment)
projects. Also have to remember to post your activities.
As I write it is day 66. This is going to end up being published
on day 67, as there is still a considerable amount of formatting, captions, and
other fiddly bits before the final posting.
Day 1) Went to the local Baronial A&S night. Spent a
great evening geeking out about weaving, historical looms, and textile
archeology with one of the other weavers in the group, and answering questions
from a new weaver. Brought a knit shawl to work on while we talked and finally
got to the first color change.
Day 2) Was in a mood after work. YouTube and shawl knitting.
3) Found one of my crafting books. Needed a review for an
upcoming blog post. Think I may have found my demo issue from the most recent
event, fortunately I still have enough for a second spindle so I will try it
out.
4) Took a break from prepping the office for more paint.
Made the framework for a camouflage item. Really hoping that the mundane item
that will be inside it won't be negatively affected.
5) Put a covering over the mundane camouflage. Not happy
with the results.
6) Checked on the drying camouflage, still not happy. Have
to rethink my technique. Evening of a couple episodes of Star Trek while
knitting a scarf. Have a trip coming up in January, and I want to get the base
pattern set up for the flights and layovers.
7) Episode worth of after work shawl knitting, then on to
the continued adulting of painting the office.
8) Baronial A&S meeting. We had fun playing with hot
metal and creating wood smoke.

Figure 2: Wood burned holiday ornaments. A Japanese
sailing ship, Norse Longship, cherry blossom, and Nordic snowflake.
9) Shawl knitting
10) Shawl knitting with frequent insistent demands for kitty
cuddles
11) Missed that yesterday was the birthday of a friend who
passed this year. Shawl knitting while watching her favorite TV show, Buffy the
Vampire Slayer.

Figure 3: Icelandic wool shawl. Pattern is from the TV
show Outlander, colors are my own choosing.
12) Shawl knitting after breakfast.
Office painting after dinner. Got about a third done, so
this makes first coat of the second 2/3. Looking forward to the paint being
done, as it will mean I can move in my floor loom. Paint, then loom.... Our
senior cat was an excellent supervisor, very good at being in the way, and
talking my ear off.
On a side note, the hook I hung above the door for whip cord
makes an excellent place to hang the portable speaker while painting.
13) Lucet after a late breakfast. Our youngest kitty had to
help with pictures.

Figure 4: Rahja supervising office painting, and being in
the way.

Figure 5: Ezabi has deemed the lucet an acceptable chin
scratcher.
14) Lucet after work.
15) Baronial A&S night. Brought a purchased tunic that
needed neck modifications. Conscripted an extra set of hands to measure where
to cut the back of the neck. Cut, and got about half hemmed.
16) Finally de-skinned the mundane camouflage. Resin did not
do what I wanted at all. Went on like syrup, so it didn't saturate the fabric.
Also didn't harden like it was supposed to, even though the mix was right. So I
still have the framework.
17) Lucet while watching one of the fish tanks fill.
Completely replaced the substrate in my riparian plants only tank. (The Silver
Dollars, which started this whole aquarium adventure, look on all plants as a
salad buffet) Gravel got replaced with sand, which will be easier for the
cleanup crew.

Figure 6: Obligatory Cory Cat picture. They are such cute
little fish.
18) Lucet
19) Lucet. Tie for an arm guard is getting closer.
20) Shawl knitting. Mostly through an entire 90's movie.
There were frequent breaks called for by the cutest of helpers.

Figure 7: Ezabi insisting it is break time from shawl knitting.
21) Supply run for paint, as well as some more brushes.
22) Baronial A&S night! Got there late because of
adulting, but brought the tunic I am modifying the neck on. Got about half done
with the hem.
23) Started composing an email to some museums. Am looking
for some specific information on some textile finds, and need more detailed
images than what is available. Plan on making a blog post with the results.
Day 24) Purchasing a mixer is suddenly very tempting. These
cookies are proving to be a workout.

Figure 8: Shortbread dough in process. Turns out you need
to get your hands in there, much easier than the available mixing tools.
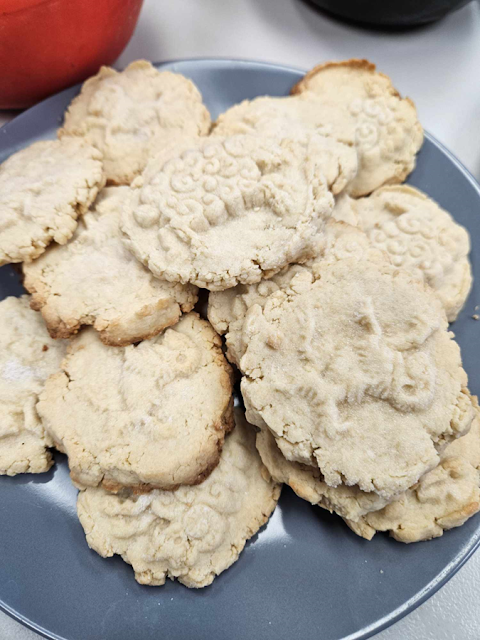
Figure 9: Finished stamped shortbread. Not bad for a
first attempt, and tasty too.
25) Neighboring Barony had a Baroness's Tea. Absolutely
awesome idea! Casual hangout with friends and snacks. Brought my lucet and two
plates of homemade shortbread cookies. Got a fair amount of luceting done. Also
only took home two individual cookies, so I am calling that a win.
26) Saint Distaff's day! Had to start a new spindle. Also
got the first coat on my office/mini studio closet door. Goodbye eggshell,
hello nutmeg! Getting closer to being done with painting. Paint, then loom
setup...... Paint, then loom setup.....

Figure 10: Behold! St Distaff's Day!

Figure 11: Closet looking much better
without the eggshell. Eventually we will replace the door, but this is good for
now.
27 & 28) Continued spinning of some Icelandic fleece
that is very minimally processed.
29) Trying a different tying method for my distaff ribbon.
Previous methods continue to spin at the attachment, meaning that no matter how
I try the prepared fiber also spins around the distaff. This time I am trying
some waxed cording and several lashes. Initial testing is so far good, if this
works I will do the same on my other distaffs. (For those also in aviation, yes
this is wire lacing cord)

Figure 12: Trying out tying with waxed
cord to stop the ribbon from spinning around the distaff.

Figure 13: Waxed cord is already
showing promise.
Day 30) Spun a bit more on the minimally processed
Icelandic. Decided that it was time to re-wrap the distaff, as quite a bit had
been used between the two spindles. I should have taken pictures. I have no
idea what experimental tying method had been used, but it was very obviously
when I was new to distaff spinning. Since I was already this far I decided to
repeat yesterday's distaff ribbon tying experiment with a waxed cord
attachment. Between the two days I am currently sold on the method. Re-wrapping
was a breeze, I wasn't chasing the ribbon around and around the knob. Fiber is
being held much more solidly than past versions. Drafting seams to have
improved as well.

31) Fell down a YouTube rabbit hole. Had started to consider
some sort of hair wrap. As much as I love my completely anachronistic hair cut,
sometimes I just don't want to deal with it, sometimes the particulars of the
event would work better with a head covering, etc. I play early period, mostly
Norse apron dresses, and Norse tunics. If it is hot out I will usually do
Roman. Had briefly considered arming caps, but am not fond of the style with my
face. So I looked up Rus head covering videos. This also led to finding videos
from various Orthodox communities, including videos about the Jewish Tichel, of
which some of the veil style wrap ties would work for events. Fun and
interesting information about other cultural practices! In my area, with the
exception of Russian Orthodox and Ren Fair/Society events, you really don't see
veiling practices. I do love videos where you learn something new and fun.
32) Continued painting the office/mini studio. Getting
closer to the end. Closet is done. Next up is the second coat of the second
2/3. Then moving the desk and bookcase for the last 1/3.
33) Hemming some tablet woven trim. These are leftovers from
a purchase, as I haven't had the time to weave all of my trim myself. Bonus is
supporting other artists. Leftovers from two rolls were enough for four bands.
Each is long enough for either a headband, or a garter. Ends were later soaked
to rearrange the fringe. Of course I had feline supervision.

Figure 15: Ezabi getting her paws into
the work.

Figure 16: Fringed and hemmed some ties.
34) Shawl knitting. Lots of kitty help, mainly by making
sure my project doesn't go anywhere.
35) Baronial meeting. A&S officer had great things to
say about the last year, the contests, the classes, and the awesome
participation. After the meeting some of us played with different styles of
head wraps/tichels. It was really cute, reminded me of kids playing with each
other's hair.
36) Tape work on the office/mini studio. So much tape. Next
will be adding more tape, and finally getting to the second coat of the second
third.
Also packed for a work related trip, made sure to pack the
scarf knitting.
Picture of suitcase void, helping me with packing.

Figure 17: Nero wanting to go on
vacation too.
37) Practice with different hair wraps. Brand new fabrics
came in.
38) Hair wrap in action, simple one worked well, discussed
tips and tricks with others.
Entered an A&S competition for unfinished objects. My
tablet weaving did very well. Tons of gorgeous objects were entered by the
populous.
Knitting on a plane. Eventually had to put it away when the
ride got too bumpy for lace knitting.
39) Some start of day knitting before the day gets busy.

Figure 18: Knits on a plane. Simple
lace diagonal in qiviut.
40-45) Knit, knit, knit, yarn over, knit two together......
Takes a long time to get significant fabric with lace weight. But it travels
well, the whole project fits in a dice bag (nope, no nerds here ;) ) It was also a
nice little break between massive amounts of studying every afternoon and
evening.
46) Spinning for a good chunk of the day. Breaks insisted
upon by the cutest of kitty supervisors. Getting close to having to re-dress
the distaff for the first color change with this BFL/silk roving.

Figure 19: Got some progress done on
the trip.

Figure 20: Almost through section one
of a three color BFL/silk roving.

Figure 21: Break time with Ezabi.
Days 47 & 48.
Got to my first color change in the BFL/silk roving I have
been working on. Originally split this roving down the middle, so when I ply
the colors will approximately line up.
I got a new book! One I have long been wanting, but never
quite got around to purchasing. A long time ago I saw an episode of The
Woodwright's Shop, where Roy's guest was talking about Roman low work benches.
Well this is the book! With plans! Now I need to figure out who in my area can
make a big slab of wood..... probably someone with a home saw mill.
So reading in the morning, spinning in the evening.

Figure 22: New book! With color two of
the BFL/silk.
Day 49, and an evening addition to 48.
49) Morning of reading about historical work benches.
Authors are currently talking about Renaissance paintings, which had been
proceeded by images of benches in frescoes and woodcuts.
Evening spinning while watching some YouTube on natural
dying.
48 additional) Our Baronial A&S night. This time it was
making various cords, so I brought along the whipcord I have been working on. A
friend was kind enough to video me working on it solo.
After the meetup I had the idea to turn the video into my
first ever reel. Shorted it up, added some music, and never could figure out
how to remove the original audio, but made the audio work for it.
I am astonished. Truly astonished. Flabbergasted and
humbled. I knew the power of social media in that I have watched others become
successful because of it. But also my little blog only gets a handful of
readers, which I am honestly ok with. This one little reel however got over a
thousand views in less than 24 hours. That is just mind blowing to me.
https://fb.watch/pYh4EwPpmp/?mibextid=Nif5oz
50) Shopping for a slab of wood to make a Roman low
workbench.
51) Supporting the arts! Going to see a play. Bonus is that
a friend is the MC.

Figure 23: Play time! This was so good!
A friend was the MC, lots of puns, some local
culture jokes, and swords! Intro to stage swordplay after the show.
52) Spent a very lazy morning watching YouTube and stitching
a headband. When I had been looking up head wraps and head scarves, I kept
finding foundation headbands and caps. Similar to how several friends who do
Slavic have a band to help keep their scarves from slipping. A dear friend had
suggested wig clips to help keep this headband in place. Worth a shot, and she
has been using them for years. My online order finally arrived, so I found some
woven cotton fabric and proceeded to start stitching. Due to my very
anachronistic haircut, the two clips are very close together. Worked great.
Wore around the house this evening, cooking dinner and doing general puttering.
Tonight's quality inspector is Nero the Stout.

Figure 24: Nero checks out the head
wrap.

Figure 25: Nero has to check out the
headband.

Figure 26: Headband with wig clips sewn
on. The clips attach to your natural hair and keep the band from shifting.
53) Suddenly I am extra excited for spring! (For reference,
my house got six more inches of snow on Saturday) Planning planting beds.
Also making sure the battle snails are well fed. That
cucumber didn't stand a chance.

Figure 27: New seeds arrived.

Figure 28: Battle snails in one of the
fish tanks
54) More workbench reading. Finished the section on the
Roman low bench (the one I am planning), and now we are moving forward in time.
55) Baronial A&S night. Started surgery on a pair of
pants. Talked to a new weaver about 2/2 twill. Discussed the upcoming
Collegium. In general had an excellent time with the chosen family.
56) Very sore from work. Did a bit of knitting on the shawl.
Ezabi made sure that it will be acceptably snuggly.

Figure 29: Ezabi snuggled under the
shawl.
57) More reading about workbenches. The book took a turn,
and we learned about securing wood to the bench through the ages. Pegs, palms,
holdfasts, notches with wedges, and vices were all discussed.
58) Collegium! So many classes, the hours absolutely flew
by! I attended wood block carving for fabric stamping, 14th and 16th century
button holes, consorting 101, and the patterning section of leather covers for
notebooks. Unfortunately I then had to run off for some officer duties, but I
only missed about a half hour.
59) Plauge of locusts! Actually one isolated house plant
turns out to have scale insects. Surprised me, because that plant is doing
amazing. Ah well, small scale agriculture and removing said pests. Reminds me
spring is coming, as I look outside to the three feet of well packed snow,
don't even remember how many inches it was when record breaking fluffy.
60) Herd management on a micro scale. Moved some of the
battle snails to new pastures. Also harvested some of the floating aquarium
plants to go to other tanks.
61) Podcast listening while puttering around the house.
Tonight was a 2021 episode of That Jorvik Viking Podcast, though this episode
was slightly more modern than the Norse. "Richard III and York with
Matthew Lewis" is an interview with a scholar of the history of King
Richard the 3rd of England.
Overall I recommend the Podcast channel. Am still currently
in the early ones. My only complaint so far is that some of the episodes have a
guest phoning in on a very poor microphone. Unfortunately that causes issues
with my auditory disorder. Otherwise the episodes are really interesting and
informative.

Figure 30: Class handouts, buttonhole
samples, and random kids book we were using to learn how to pattern leather
book covers. Everyone got a random book of varying size.
62) Received a custom printed Skjolehamn hood, took pictures
with it in the snow. The maker included some printed patches and a test print. Test
print was too pretty to just let it sit, so hemming it as a napkin.
63) Continuing the napkin hem. Using buttonhole stitch,
which I learned at my friend’s recent class. Looks similar to blanket, but it
has an extra twist.

Figure 31: Practicing the buttonhole
stitch on a napkin.
64) Reading during lunch about the Skjolehamn bog burial
from 11th century Norway.
65) Picked up the slab for the Roman Low Workbench. It is
beautiful, and HEAVY. Super excited. This long term dream is becoming a
reality.
66) Compiling all these posts into a blog post. Also ordered
materials for legs and pegs on the Roman Low Workbench, and a tenon cutter for
the tops of the legs.
67) Fiddly bits of blog posting. Formatting, captions, and
finally making sure everything correct before hitting publish. Ended up dozing off at the computer, guess it's past bed time.
68) Napkin hemming while filling fish tanks. Last of the blog editing.

Goodness! Day one seems so long ago already, and I am not
yet to ¾ of the challenge. Currently the plans for the future include putting
together the Roman Low Bench, and finally finishing the office painting. We
will have to see what the next 32 days brings.

Figure 33: My little shadow is never
far away.